How to book a meeting room in Outlook
Booking a meeting room in Outlook is a breeze, but there are a couple of methods to consider. The most common way is through the Room Finder. Here’s how:
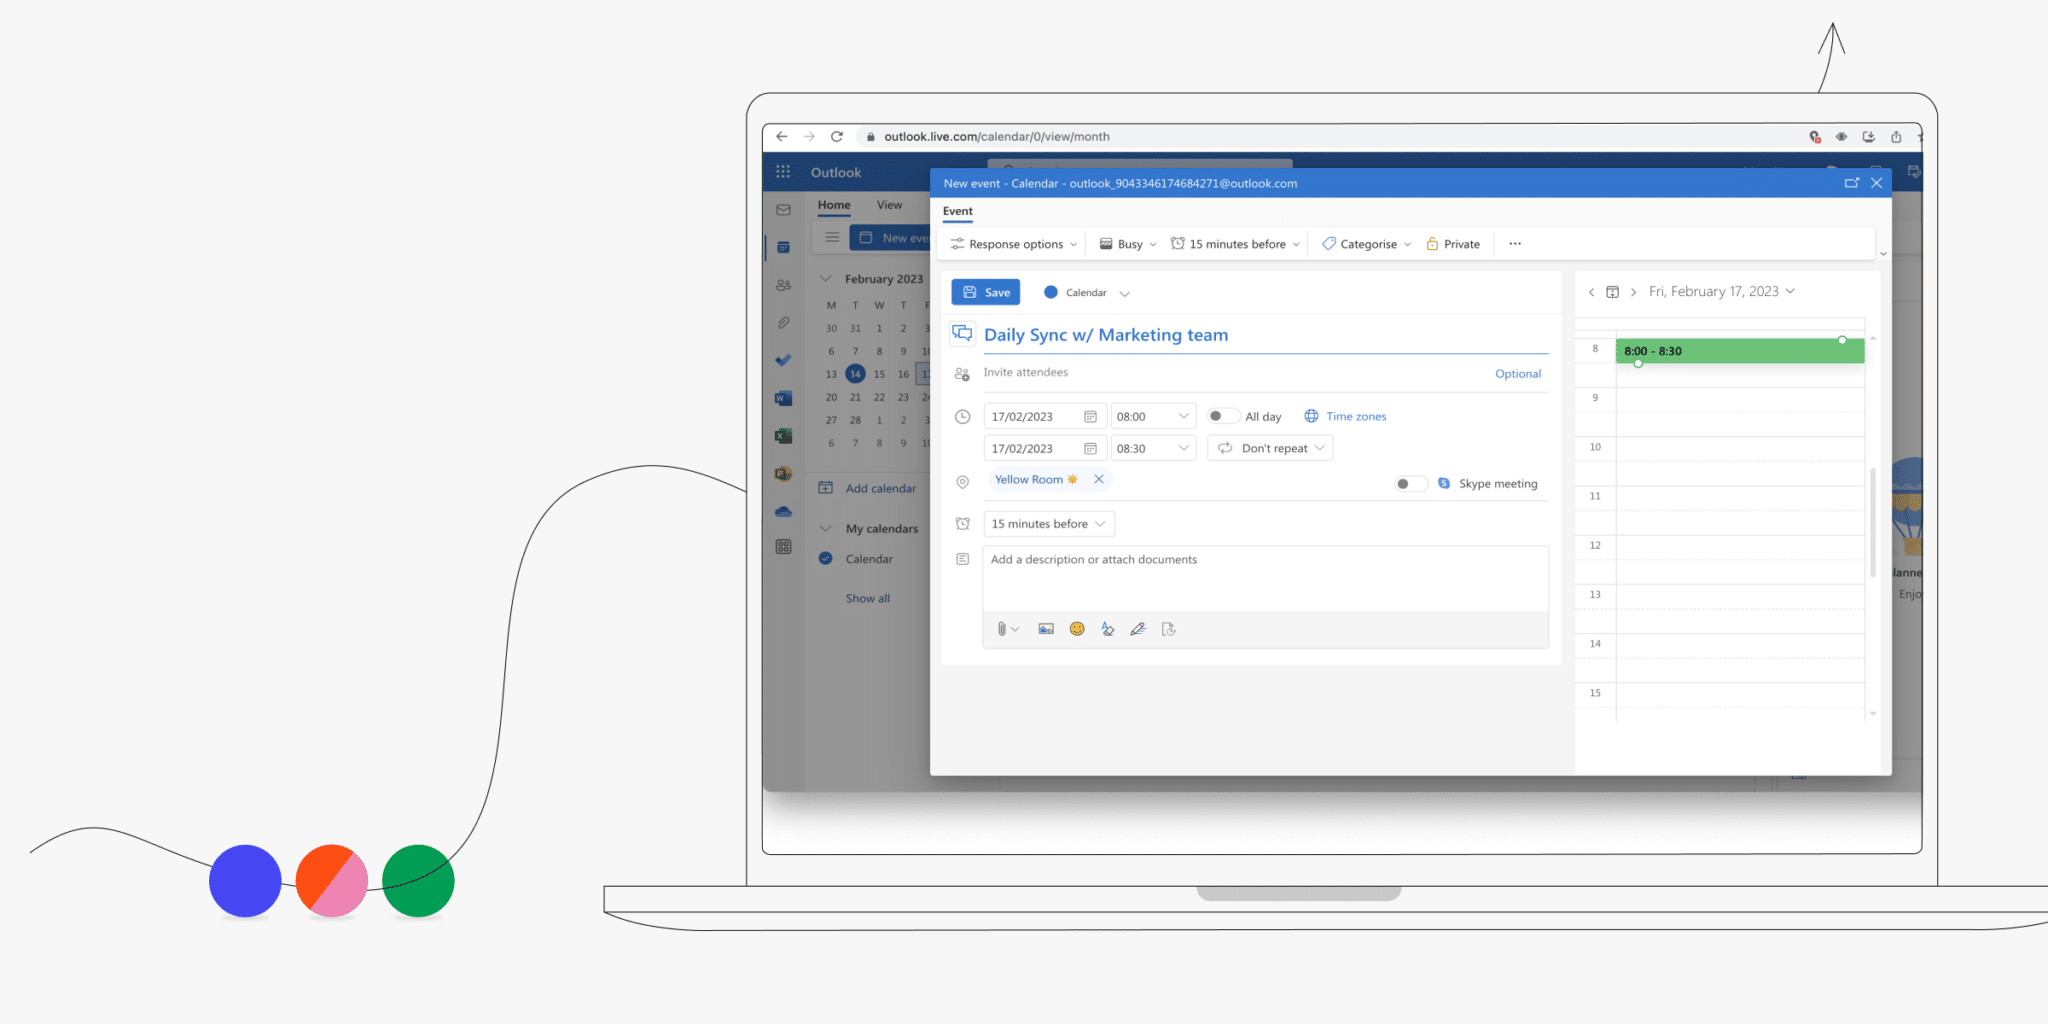
- First, open your Outlook Calendar and click “New Meeting” to set up the details of your gathering. Fill in the subject, date, time, and invite attendees as usual.
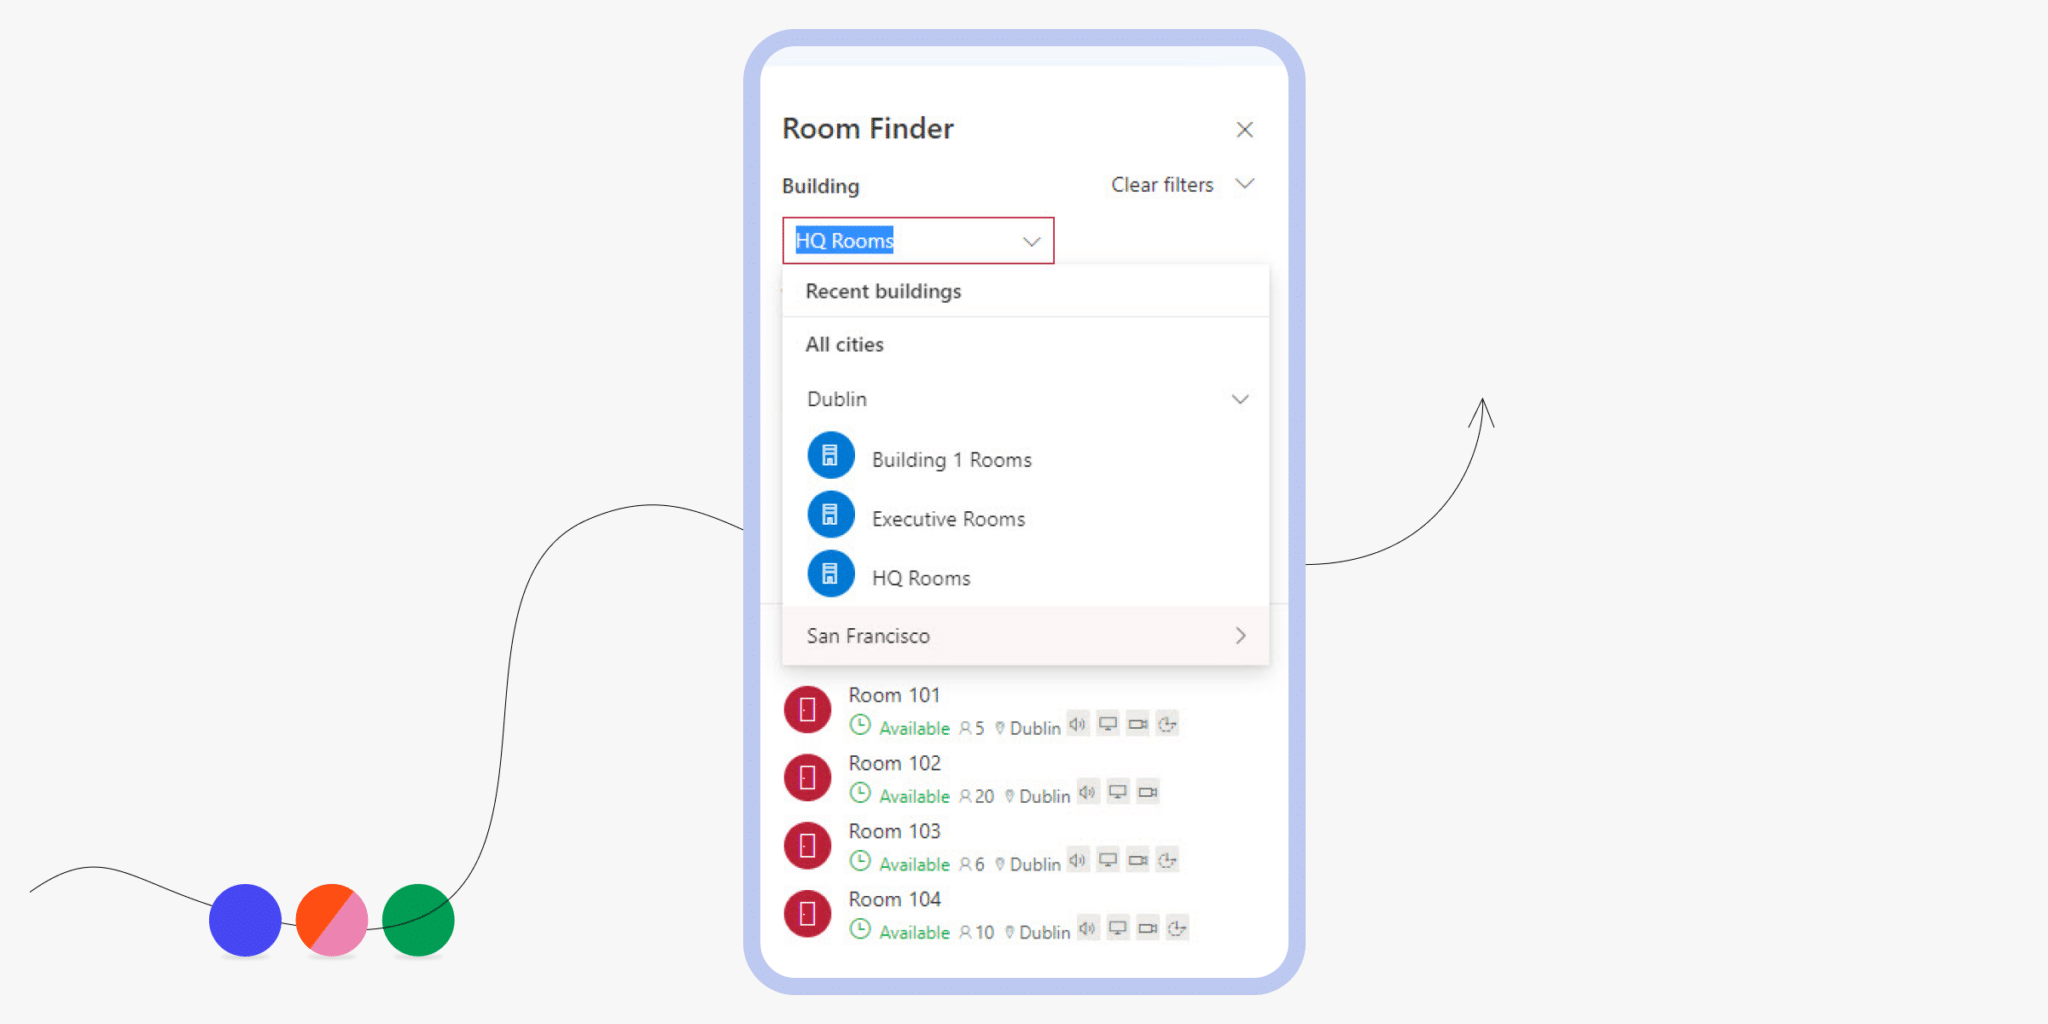
- Next to the Location field, you’ll see a “Rooms…” button. Click on that to launch the Room Finder. This tool lets you browse available rooms based on location or search for a specific one by name.
- Once you’ve chosen your ideal space, select it and click “OK” to add it to the meeting invite.
While the Room Finder is a handy feature, it’s recommended to utilize additional scheduling tools whenever possible. These room booking devices (or, scheduling tools) installed on the conference room doors themselves, offer several advantages.
For instance, they provide real-time availability information, eliminating any discrepancy between the online calendar and the physical room’s usage. Additionally, these tools can be integrated with Outlook, allowing you to directly book the room from the device itself, streamlining the process altogether. So, while Outlook’s Room Finder is a great option, consider exploring additional scheduling tools for a more efficient and up-to-date booking experience.
Booking meeting rooms in Outlook using a scheduling tool
Organizations that rely on conference rooms for meetings can benefit from a more efficient booking system. Instead of dealing with cumbersome request forms, Microsoft Outlook users can streamline the process by using an Outlook room booking system, allowing them to manage reservations seamlessly within their calendar.
For instance, Joan is a meeting room reservation system that syncs with your calendar. To book meeting rooms in Outlook using Joan, follow these steps:
- Integrate Joan with Microsoft Exchange or Microsoft 365:
- Access Room Finder in Outlook:
- Open your Outlook calendar and start a new meeting request.
- Select the required date and time for your event.
- Under the Scheduling Assistant tab, you’ll find a list of available rooms in Outlook (updated with your rooms from Joan).
- Book the room straight away and add it to your timeslot. You can also book multiple rooms at once.
- Automatic syncing:
- Joan’s integration with Microsoft Exchange ensures any bookings made through the tool or mounted devices (outside conference rooms or on doors) automatically sync with your Outlook calendar.
- This prevents double bookings and keeps availability up to date.
- All set up!
- Now, your meeting will be visible on the scheduling tool in front of the meeting room
By using Joan integrated with Microsoft Exchange, you enhance communication and collaboration across your team. The centrally located information makes it simple to schedule and manage room resources efficiently within your Microsoft Office suite.
Benefits of using the right Microsoft room reservation solution
- Effortless organization – Forget the hassle of scheduling chaos! Use Outlook’s calendar in conjunction with features like room mailboxes, the room finder, and the scheduling assistant. This powerful combination simplifies meeting requests and keeps everything neatly organized.
- Crystal clear visibility – No more wandering around searching for an empty room. Outlook’s room resource and equipment mailbox features offer real-time visibility into available spaces directly within your calendar.
- Simplified room selection – Shared calendar access through your Microsoft account makes selecting the perfect room a breeze.
- Swift event management – This organized approach allows you to manage multiple events efficiently, eliminating double-bookings and ensuring a smooth schedule flow.
- Boosted productivity – Say goodbye to wasted time searching for rooms. With room finder and room resource tools at your fingertips, your productivity will soar.
- Informed decisions – Gain valuable insights for seamless event planning. This system streamlines conference room availability and equipment booking, providing all the information you need to make informed decisions.
What is the Room Finder feature in Outlook?
The Room Finder feature in Outlook is a powerful tool that helps you book meeting rooms in Outlook efficiently. By leveraging this feature, users can easily find rooms and meeting spaces within an organization. When using the Room Finder, you can select room resources and room mailboxes from the shared calendar or room calendar, making the process seamless. The Room Finder integrates with the scheduling assistant, allowing you to check availability and schedule your conference rooms with ease. Whether you’re looking to book a conference room or multiple meeting rooms, the Room Finder simplifies the task. Using your Microsoft account, this feature enhances the overall experience of booking rooms in Outlook. Additionally, it’s designed to work with your Outlook calendar, ensuring that all meeting details are synchronized. The Room Finder is an essential part of any well-managed Microsoft Office environment, streamlining the scheduling process for all users, maintaining efficiency and organization.
How to use the “AutoPick” feature for room reservations in Outlook
The “AutoPick” feature in Outlook streamlines the process of booking meeting rooms in Outlook. This tool helps users quickly find available rooms in Outlook, making workspace booking more efficient. To use this feature, start by creating a new meeting request. Select the room calendar and add relevant details to the event. Use the “AutoPick” option to select room availability effortlessly. The scheduling assistant will assist you in managing your room resource, ensuring your meeting room is free at the desired time. With a shared tcalendar or room mailbox, this feature simplifies scheduling conference rooms and other meeting spaces. Leveraging the capabilities of your Microsoft account, the room finder tool within the Outlook calendar quickly identifies available rooms. Efficient scheduling and booking are crucial for seamless meetings in Microsoft Office, and the “AutoPick” feature ensures your room reservations go smoothly. This makes it easier to manage meeting requests and optimize room usage.
How to manage an equipment mailbox for a meeting room
To manage an equipment mailbox for a meeting room in Outlook, you first need a Microsoft account. An equipment mailbox or room mailbox is essential when you want to book meeting rooms in Outlook effectively. You can use the room finder and scheduling assistant for seamless workspace booking. To create a new meeting request, open your Outlook calendar and select room options from the equipment mailboxes available. Access the shared calendar for easy scheduling of conference rooms. Utilize the room resource search to select room preferences. An equipment mailbox simplifies booking meeting spaces and ensures resource availability. A well-configured room calendar will enhance productivity in organizing conference rooms. Regularly check the room mailbox to manage bookings efficiently. Microsoft provides tools to streamline this process, making room resource scheduling straightforward. Remember, a properly managed equipment mailbox is key to seamless room reservations and optimal usage of your available meeting rooms.
Can you reserve multiple rooms in Outlook?
Yes, you can reserve and book multiple rooms in Outlook for your meetings. When you want to book meeting rooms in Outlook, utilize the Scheduling Assistant to manage your room resources efficiently. You can add multiple rooms in Outlook by creating a meeting request, using the room calendar to select room options. With a Microsoft account, you can navigate to the Outlook calendar and use the Room Finder feature for easier workspace booking. Reserving conference rooms or other meeting rooms in Microsoft Office is simple. You can manage your room mailbox and shared calendar effectively, ensuring all your meeting spaces are appropriately scheduled. Scheduling an event or making bookings across multiple rooms in Outlook is streamlined. To finalize, schedule meetings with different rooms, confirm via Room Finder, and ensuring all conference room bookings are listed in the room calendar. Thus, booking multiple rooms in Outlook is seamless.
For any assistance or inquiries, don’t hesitate to reach out to us. We’re here to ensure your meeting room management is effortless!

In Summary
Knowing how to reserve a room in Outlook is a pretty easy process, as long as you’re set up with the right booking system. This makes managing your calendar a lot more efficient.
Joan’s meeting room scheduling software for Outlook can be used on your desktop or mobile device. Simply log into one platform (single sign-on available), and create and manage conference room bookings through a simple interface. This will automatically be updated on your calendar and shared with booking attendees. Staying more organized just got a lot easier!
Frequently Asked Questions
How do I set up a shared desk?
Setting up a shared desk can be a relatively straightforward process, but it does require some planning and preparation. Here are some steps you can take to set up a shared desk in your office:
Monitor and evaluate the shared desk system: Monitor and evaluate the shared desk system to ensure it is working as intended and make any necessary adjustments.
Determine the number of shared desks needed: Based on the size of your office and the number of employees, determine how many shared desks you will need. Make sure to consider factors such as the number of employees who work remotely or travel frequently, and the number of employees who need to be in the office at the same time.
Choose the location of the shared desks: Select the location of the shared desks based on factors such as natural light, proximity to common areas, and accessibility. It’s important to consider the ergonomics and comfort of the space for the employees.
Purchase and set up the necessary furniture and equipment: Purchase or rent the necessary furniture and equipment for the shared desks, such as desks, chairs, and filing cabinets. Make sure that the furniture is comfortable, ergonomic, and easily adjustable.
Choose a desk a reservation system like Joan Desk: Create a system for employees to reserve a shared desk in advance, this can be done through software or apps. This can help to ensure that there are always enough desks available for employees who need them.
Establish rules and guidelines: Create guidelines for the use of shared desks, such as how to reserve a desk, how to clean and organize a desk, and how to share common spaces.
Communicate the shared desk system to all employees: Communicate the shared desk system to all employees, including how it works, how to reserve a desk, and the rules and guidelines. Make sure that all employees understand the benefits and how to use the system.
How do I manage my desk share?
Managing a shared desk system can be challenging, but with the right approach, it can be done effectively. Here are some tips on how to manage a shared desk system:
Be flexible with the shared desk system and be open to feedback. Continuously monitor and make adjustments to the system as needed.
Set up a reservation system like Joan Desk booking: Set up a system for employees to reserve a shared desk in advance, this can be done through software or apps. This can help to ensure that there are always enough desks available for employees who need them.
Create clear rules and guidelines: Establish clear rules and guidelines for the use of shared desks, such as how to reserve a desk, how to clean and organize a desk, and how to share common spaces. Make sure that all employees are aware of the rules and guidelines.
Monitor and enforce the rules: Regularly monitor the shared desks to ensure that the rules and guidelines are being followed. If necessary, take action to enforce the rules, such as reminding employees of the rules or reassigning desks.
Encourage responsible use: Encourage employees to take responsibility for the shared desks by reminding them to clean and organize their desks after use.
Keep track of usage: Keep track of the usage of the shared desks and make adjustments as necessary. For example, if a certain shared desk is in high demand, consider adding another shared desk in that area.
Provide training and support: Provide training and support to employees to help them understand how to use the shared desk system and how to make the most of the shared workspace.
What is workspace sharing?
Workspace sharing refers to the practice of sharing a physical workspace, such as an office or a co-working space, among multiple individuals or organizations. It can take several forms, such as:
- Hot desking: A system where employees can use any available desk or workstation on a first-come, first-served basis.
- Desk sharing: A system where employees are assigned a specific desk or workstation, but it can be shared with others when not in use.
- Co-working spaces: A shared workspace where individuals or organizations from different industries or businesses can work together in a shared environment.
- Shared office space: A facility where multiple businesses or organizations share a physical office space, which may include common areas, conference rooms, and other amenities.
- Workspace sharing can offer a number of benefits, such as cost savings, increased flexibility, and the opportunity to collaborate with other individuals or organizations. However, it can also present challenges, such as the need to manage competing demands for resources and the potential for disruptions to the work environment. Workspace sharing can also be a great way to reduce the environmental footprint by reducing real estate and energy consumption.
It’s important to establish clear guidelines and expectations for the use of shared resources and to implement a system like Joan Desk booking.